By default the WiFiG25 boards get the IP address from the DHCP server on your LAN this article explains how to discover its IP. If you prefere to assign a static IP address to it read this article:
Reading the IP address from the Debug Port console or SSH
To use this method you need enter the system command line
Then you will get the follow linux prompt:
~#
Now type this command:
# ifconfig wlan0
wlan0     Link encap:Ethernet  HWaddr 00:E3:13:C0:2E:AE
          inet addr:192.168.1.105  Bcast:255.255.255.255  Mask:255.255.255.0
          inet6 addr: fe80::2e3:13ff:fec0:2eae/64 Scope:Link
          UP BROADCAST RUNNING MULTICAST  MTU:1500  Metric:1
          RX packets:590 errors:0 dropped:5 overruns:0 frame:0
          TX packets:42 errors:0 dropped:2 overruns:0 carrier:0
          collisions:0 txqueuelen:1000
          RX bytes:160159 (156.4 KiB)  TX bytes:6313 (6.1 KiB)
The IP address assigned is indicated as inet addr. In this case it is equal to 192.168.1.105. If no address is listed your DHCP is probably not working well or the netcable is detached.
Getting the IP address from the DHCP server on your LAN
If you have access to the administrator panel of the DHCP on your LAN this is probably the easiest way to discover the IP address assigned to the CORE9G25 board. You can identify the IP easily by searching for hostname CORE9G25 or MAC address that starts with 00:04:25:..:..:...
Using an IP Scanner
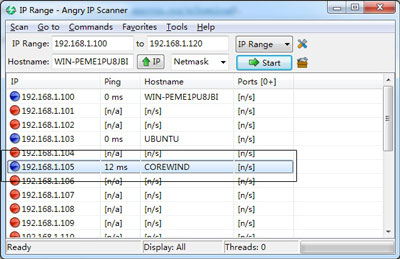
Another way to discover your IP address is by using the free utility Angry IP scanner available on this link http://www.angryip.org/w/Download).
This utility is available for Windows, Linux and MAC and can scan all the hosts wired on your LAN getting its hostname as shown below

The WiFiG25 Board Hostname is COREWIND, so you can confirm the IP address is 192.1686.1.105.
Using a shell script
A method (although not very fast) to discover your CORE9G25 board IP address is using this simple script:
#!/bin/sh
echo "Usage: $0 "
i=1
while [ "$i" -lt 254 ]
do
  ping -c 1 -W 1 "$1.$i" > /dev/null
    if [ "$?" -ne 1 ]
    then
        echo "$1.$i SUCCESS !"
    else
        echo "$1.$i fail"
    fi
    i=$(( $i + 1 ))
done
Save it in a file (for example scanip.sh) and enable as executable file with chmod +x scanip.sh then execute providing the base address of your LAN. For example:
./scanip.sh 192.168.1
It will ping all the addresses from 1 to 254 on your LAN in that way:
Usage: ./scanip.sh
192.168.1.1 SUCCESS !
192.168.1.2 SUCCESS !
192.168.1.3 fail
192.168.1.4 fail
192.168.1.5 SUCCESS!
192.168.1.6 fail
...
The timeout on fail condition is 1 second so the test needs max 254 second to scan a C class network.

 微博
微博
